Crankshaft deflection occurs over time, during the repeated and continuous use of the crankshaft.
It is a process that occurs in the background as the engine operates and, though it can’t be seen without a detection instrument, it causes significant damage to the mechanism.
- Without correcting the shifts in the crankshaft over time, the machine will wear unevenly, cause undue stress on the supporting components.
- This will detract from the useful lifetime of the engine, causing it to wear out prematurely. This naturally occurring problem can be easily corrected however, with small adjustments.
Knowing when and how to adjust the crankshaft will extend its lifetime, saving time and money.
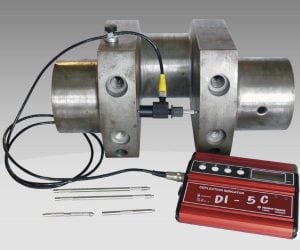
 The DI-5 and DI-5C from Prisma Tibro is easy to use and can be programmed and reprogrammed to check the position of each mechanism at any time.
Using the DI-5 or DI-5C to regularly check for crankshaft deflection requires only a few minutes of your time and can extend the life of the engine by years.
In the past, a dial gauge was used to detect misalignment of the crankshaft.
This required a much longer process, with detailed readings the engineer would take himself.
It required reading the crankshaft at each of five positions (sides, top, and two on either side of the bottom), and then interpreting these numbers manually to see how the crankshaft should be adjusted.
- A thorough understanding of the process and meticulous measurements were required to achieve accurate measurements, and, even if the process was completed correctly, there was no guarantee the gauge wouldn’t slip slightly, upsetting the reading.
Furthermore, the gauge required the engineer to access the mechanism from every angle, covering him in dirt and grease.
By automating and computerizing the measurement device, the process takes only a fraction of the time and measurements are much more accurate.
The DI-5 and DI-5C devices fit securely into the crankshaft and stay there, without shifting or sliding.
Like the dial gauge, the DI-5/5C detects misalignment by measuring the crankshaft at each point. The numbers are recorded in the device’s internal memory. With each measurement taken, the device then compares the numbers against each other and provides a measure of misalignment without further calculations.
The DI-5/5C can be programmed an infinite number of times and measure any number of crankshafts using the same process.
This eliminates the need to manually take numbers and allows the engineer to measure each point and each mechanism in the engine quickly and easily. An attached Ovality kit on the DI-5/5C will measure cylinder liner wear and show where the cylinders are uneven.

